Caterpillar 1 ft in 7.5 min. 18 min?
- A. 2.4
- B. 8
- C. 11.5
- D. 25.5
Correct Answer & Rationale
Correct Answer: A
To determine how far the caterpillar travels in 18 minutes, first calculate its speed. It moves 1 foot in 7.5 minutes, which equates to \( \frac{1 \text{ ft}}{7.5 \text{ min}} \). In 18 minutes, the distance covered can be calculated using the formula: \[ \text{Distance} = \text{Speed} \times \text{Time} \] Converting 18 minutes into feet: \[ \text{Distance} = \left(\frac{1 \text{ ft}}{7.5 \text{ min}}\right) \times 18 \text{ min} = 2.4 \text{ ft} \] Option B (8) overestimates the distance, while C (11.5) and D (25.5) significantly exceed the calculated distance, demonstrating a misunderstanding of the speed-time relationship.
To determine how far the caterpillar travels in 18 minutes, first calculate its speed. It moves 1 foot in 7.5 minutes, which equates to \( \frac{1 \text{ ft}}{7.5 \text{ min}} \). In 18 minutes, the distance covered can be calculated using the formula: \[ \text{Distance} = \text{Speed} \times \text{Time} \] Converting 18 minutes into feet: \[ \text{Distance} = \left(\frac{1 \text{ ft}}{7.5 \text{ min}}\right) \times 18 \text{ min} = 2.4 \text{ ft} \] Option B (8) overestimates the distance, while C (11.5) and D (25.5) significantly exceed the calculated distance, demonstrating a misunderstanding of the speed-time relationship.
Other Related Questions
Equivalent to 2(4f+2g)? Select ALL.
- A. 4*(2f+g)
- B. 4(2f+2g)
- C. 2f(4+2g)
- D. 16f+4g
- E. 8f+2g
Correct Answer & Rationale
Correct Answer: A,F
To determine which expressions are equivalent to \( 2(4f + 2g) \), we first simplify it: \[ 2(4f + 2g) = 8f + 4g \] Now, let's analyze each option: **A: \( 4(2f + g) \)** This expands to \( 8f + 4g \), matching our simplified expression. **B: \( 4(2f + 2g) \)** This simplifies to \( 8f + 8g \), which does not match \( 8f + 4g \). **C: \( 2f(4 + 2g) \)** This expands to \( 8f + 4fg \), introducing an extra term \( 4fg \) that makes it unequal. **D: \( 16f + 4g \)** This expression has \( 16f \), which is double the \( 8f \) we expect, thus it is not equivalent. **E: \( 8f + 2g \)** Here, while \( 8f \) matches, \( 2g \) does not equal \( 4g \), making it non-equivalent. **F: \( 8f + 4g \)** This matches our simplified expression exactly, confirming its equivalence. In summary, options A and F correctly represent the original expression, while B, C, D, and E do not.
To determine which expressions are equivalent to \( 2(4f + 2g) \), we first simplify it: \[ 2(4f + 2g) = 8f + 4g \] Now, let's analyze each option: **A: \( 4(2f + g) \)** This expands to \( 8f + 4g \), matching our simplified expression. **B: \( 4(2f + 2g) \)** This simplifies to \( 8f + 8g \), which does not match \( 8f + 4g \). **C: \( 2f(4 + 2g) \)** This expands to \( 8f + 4fg \), introducing an extra term \( 4fg \) that makes it unequal. **D: \( 16f + 4g \)** This expression has \( 16f \), which is double the \( 8f \) we expect, thus it is not equivalent. **E: \( 8f + 2g \)** Here, while \( 8f \) matches, \( 2g \) does not equal \( 4g \), making it non-equivalent. **F: \( 8f + 4g \)** This matches our simplified expression exactly, confirming its equivalence. In summary, options A and F correctly represent the original expression, while B, C, D, and E do not.
Graph for data over time?
- A. Bar
- B. Line
- C. Stem-and-leaf
- D. Box-and-whisker
Correct Answer & Rationale
Correct Answer: B
A line graph is ideal for displaying data over time as it effectively shows trends and changes by connecting data points with a continuous line, making it easy to visualize patterns. Option A, a bar graph, is better suited for comparing discrete categories rather than illustrating changes over time. Option C, a stem-and-leaf plot, is primarily used for displaying the distribution of numerical data and is not designed for time-series analysis. Option D, a box-and-whisker plot, summarizes data distribution and highlights outliers but does not convey trends over time effectively.
A line graph is ideal for displaying data over time as it effectively shows trends and changes by connecting data points with a continuous line, making it easy to visualize patterns. Option A, a bar graph, is better suited for comparing discrete categories rather than illustrating changes over time. Option C, a stem-and-leaf plot, is primarily used for displaying the distribution of numerical data and is not designed for time-series analysis. Option D, a box-and-whisker plot, summarizes data distribution and highlights outliers but does not convey trends over time effectively.
Shaded region shows?
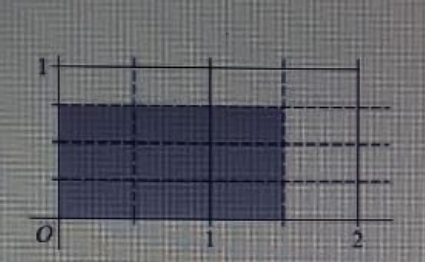
- A. 3/4 x 1/2
- B. 3/4 x 3/4
- C. 3/4 x 3/2
- D. 3/4 x 3
Correct Answer & Rationale
Correct Answer: A
The shaded region represents the area of a rectangle formed by multiplying two fractions. Option A, \( \frac{3}{4} \times \frac{1}{2} \), correctly calculates the area of a rectangle with a length of \( \frac{3}{4} \) and a width of \( \frac{1}{2} \), resulting in \( \frac{3}{8} \). Option B, \( \frac{3}{4} \times \frac{3}{4} \), represents a larger area, \( \frac{9}{16} \), which does not match the shaded region. Option C, \( \frac{3}{4} \times \frac{3}{2} \), yields \( \frac{9}{8} \), exceeding the shaded area. Finally, option D, \( \frac{3}{4} \times 3 \), results in \( \frac{9}{4} \), also too large. Thus, only option A accurately reflects the area of the shaded region.
The shaded region represents the area of a rectangle formed by multiplying two fractions. Option A, \( \frac{3}{4} \times \frac{1}{2} \), correctly calculates the area of a rectangle with a length of \( \frac{3}{4} \) and a width of \( \frac{1}{2} \), resulting in \( \frac{3}{8} \). Option B, \( \frac{3}{4} \times \frac{3}{4} \), represents a larger area, \( \frac{9}{16} \), which does not match the shaded region. Option C, \( \frac{3}{4} \times \frac{3}{2} \), yields \( \frac{9}{8} \), exceeding the shaded area. Finally, option D, \( \frac{3}{4} \times 3 \), results in \( \frac{9}{4} \), also too large. Thus, only option A accurately reflects the area of the shaded region.
Rounds to 87.5 in tenths?
- A. 88
- B. 87.56
- C. 87.459
- D. 87.05
Correct Answer & Rationale
Correct Answer: C
When rounding to the nearest tenth, the digit in the hundredths place determines whether to round up or down. For 87.5, the first digit after the decimal is 5, indicating that we round up. Option A (88) rounds to the nearest whole number, not the nearest tenth. Option B (87.56) rounds to 87.6, which is higher than 87.5. Option D (87.05) rounds to 87.1, which is lower. Only option C (87.459) rounds to 87.5 when considering the tenths place, making it the only valid choice for rounding to 87.5 in tenths.
When rounding to the nearest tenth, the digit in the hundredths place determines whether to round up or down. For 87.5, the first digit after the decimal is 5, indicating that we round up. Option A (88) rounds to the nearest whole number, not the nearest tenth. Option B (87.56) rounds to 87.6, which is higher than 87.5. Option D (87.05) rounds to 87.1, which is lower. Only option C (87.459) rounds to 87.5 when considering the tenths place, making it the only valid choice for rounding to 87.5 in tenths.